In This Article
- Introduction
- 1. Mountain Pose (Tadasana)
- 2. Downward Facing Dog (Adho Mukha Svanasana)
- 3. Child’s Pose (Balasana)
- 4. Warrior I (Virabhadrasana I)
- 5. Warrior II (Virabhadrasana II)
- 6. Tree Pose (Vrksasana)
- 7. Cat-Cow Pose (Marjaryasana-Bitilasana)
- 8. Bridge Pose (Setu Bandhasana)
- 9. Seated Forward Bend (Paschimottanasana)
- 10. Corpse Pose (Savasana)
- Conclusion
Introduction
There’s no denying the countless benefits of practicing yoga regularly. From boosting flexibility and strength to enhancing mental clarity and relieving stress, yoga has something for everyone. But diving into all the different poses and sequences can feel overwhelming if you’re new to yoga.
We’ve created a list of 10 beginner-friendly yoga poses you can easily try at home. These poses will help you build a solid foundation for your practice while offering plenty of physical and mental perks.
1. Mountain Pose (Tadasana)
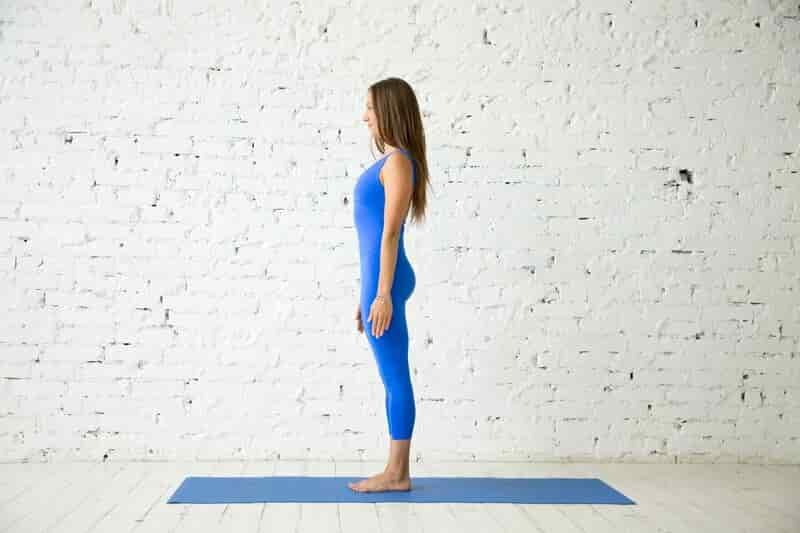
Mountain Pose, or Tadasana, is the foundational starting point for many standing yoga postures. This Pose helps improve posture, balance, and alignment, making it essential for beginners and advanced practitioners.
Benefits:
- Enhances awareness of body alignment
- Improves balance and stability
- Strengthens thighs, knees, and ankles
- Firms the abdomen and buttocks
- Reduces flat feet
How to Perform Mountain Pose:
- Stand Tall: Start by standing with your feet together, your heels slightly apart, and your big toes touching. Distribute your weight evenly across both feet.
- Engage Your Thighs: Firm your thigh muscles and lift your kneecaps without hardening your lower belly. Elevate your inner ankles to fortify your inner arches.
- Lengthen Your Spine: Lengthen your tailbone toward the floor and lift your pubis toward the navel. Keep your pelvis neutral, neither tilting forward nor backward.
- Open Your Chest: Broaden your collarbones and lift the top of your sternum straight toward the ceiling. Release your shoulder blades down your back and widen them away from the spine.
- Align Your Head: Balance your head directly over the center of your pelvis, with the underside of your chin parallel to the floor. Soften your throat and the base of your tongue.
- Extend Your Arms: Let your arms hang naturally beside your torso. Alternatively, you can press your palms together in front of your chest in a prayer position.
- Focus Your Gaze: Keep your eyes forward and focus on a single eye-level point.
- Breathe: Take deep, even breaths. Maintain the position for 30 seconds to 1 minute, ensuring steady breaths.
Incorporating Mountain Pose into your practice will build a strong foundation for more complex poses and enhance your overall yoga experience.
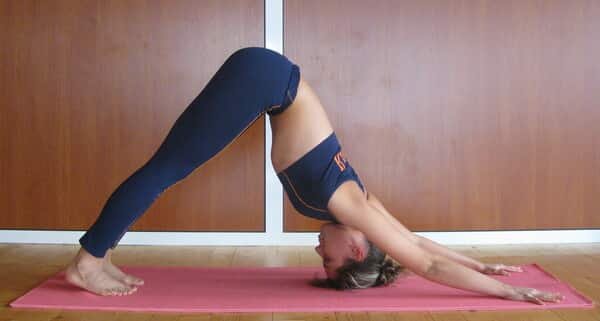
2. Downward Facing Dog (Adho Mukha Svanasana)
Benefits:
- Strengthens Muscles: Works out the arms, shoulders, back, and legs to build muscle strength.
- Improves Flexibility: Stretches the hamstrings, calves, and arches, increasing flexibility.
- Enhances Circulation: The inverted position boosts blood flow to the brain, improving alertness and energy levels.
- Relieves Stress: Encourages deep breathing and relaxation, helping to reduce stress and tension.
- Improves Posture: Strengthens and lengthens the spine, aiding in better posture.
How to Perform:
- Start on Hands and Knees: Begin in a tabletop position with your hands directly under your shoulders and knees under your hips.
- Position Your Hands: Spread your fingers and press firmly into the mat, engaging your upper arms and shoulders.
- Lift Your Hips: Tuck your toes under and lift your hips towards the ceiling, straightening your legs as much as possible.
- Adjust Feet and Legs: Position your feet hip-width apart and press your heels towards the floor. It’s okay if your heels don’t touch the ground initially.
- Engage Core: Draw your navel towards your spine to engage your core and support your lower back.
- Lengthen the Spine: Press your hands into the mat, extending through your arms to keep your spine long and straight.
- Relax Your Neck: Let your head hang naturally between your arms, keeping your ears aligned with your upper arms.
- Breathe Deeply: Hold the position for several breaths, focusing on deep, steady inhalations and exhalations.
- Release: To come out of the Pose, gently lower your knees to the mat and return to the tabletop position.
Practice this Pose regularly to experience its full benefits for your body and mind.
3. Child’s Pose (Balasana)
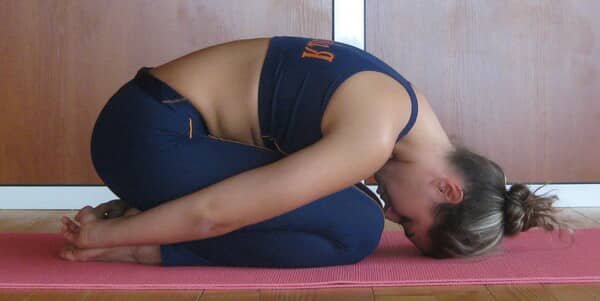
Child’s Pose, known as Balasana in Sanskrit, is a go-to resting posture in yoga that gently stretches your back, hips, thighs, and ankles.
How to Perform Child’s Pose:
- Start in a Kneeling Position: Get on your knees with your big toes touching and your knees apart. Sit back on your heels.
- Extend Your Arms: Exhale and lean forward, extending your arms on the floor with your palms down. Keep your arms shoulder-width apart.
- Lower Your Torso: Lower your torso between your knees, letting your chest rest on or near your thighs. Your forehead should touch the mat.
- Relax Your Shoulders and Back: Relax your shoulders and sink towards the floor. Maintain a straight spine and a relaxed neck.
- Hold the Position: Breathe deeply and stay in the Pose for 1 to 3 minutes or as long as it feels comfortable. Focus on your breath and let your body melt into the stretch.
Benefits of Child’s Pose:
- Stretches the Back and Spine: Provides a gentle stretch to your spine, relieving tension and increasing flexibility.
- Opens the Hips: Helps open the hips and stretch the inner thighs, which is especially beneficial if you sit for long periods.
- Calms the Mind: Promotes relaxation and reduces stress and anxiety.
- Relieves Fatigue: Alleviates fatigue and serves as a resting pose during a yoga session.
Variations and Modifications:
- Extended Child’s Pose: For a deeper shoulder and upper back stretch, extend your arms in front of you.
- Supported Child’s Pose: Place a blanket or bolster between your thighs and calves for extra support if you have tight hips or knees.
- Side Stretch Child’s Pose: Walk your hands to the right or left side to stretch the sides of your torso.
Child’s Pose is a versatile and accessible posture suitable for all levels of yoga practitioners, offering a moment of rest and rejuvenation in any practice.
4. Warrior I (Virabhadrasana I)
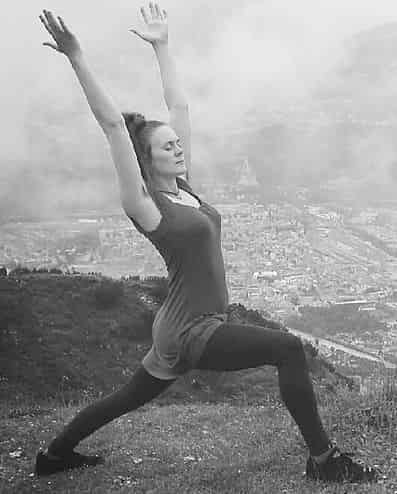
Warrior I (Virabhadrasana I) is a fundamental yoga pose that enhances strength, stability, and flexibility. Here’s a simple guide on how to do it:
- Starting Position: Begin in a standing position at the front of your mat (Mountain Pose).
- Step Back: Move your left foot back about 3-4 feet. Keep your right foot forward, with your left toes pointing slightly outward at a 45-degree angle.
- Align Your Hips: Rotate your hips to face forward, adjusting the back foot if needed.
- Bend the Front Knee: Bend your right knee, ensuring it’s directly over your ankle, creating a 90-degree angle. Your back leg should stay straight and strong.
- Lift Your Arms: Inhale and raise your arms overhead, keeping them shoulder-width apart or bringing your palms together. Extend through your fingertips while keeping your shoulders relaxed.
- Engage the Core: Pull your belly button towards your spine to engage your core muscles, supporting your lower back.
- Lengthen the Spine: Lift through the crown of your head to lengthen your spine and keep your chest open. Look forward or slightly upward.
- Hold the Pose: Stay in this position for several breaths, aiming for 20-30 seconds. Focus on deep inhalations and complete exhalations.
- Release: To exit the Pose, straighten your front leg, lower your arms, and move your back forward to return to Mountain Pose. Repeat on the other side.
Benefits of Warrior I:
- Strengthens the legs (quadriceps, hamstrings, and calves).
- Opens the hips and chest.
- Improves balance and stability.
- Enhances concentration and focus.
- Builds stamina and endurance.
Common Mistakes to Avoid:
- Allowing the front knee to fall inward: Keep it aligned with the ankle and toes.
- Lifting the shoulders: Keep them relaxed as you extend your arms.
- Collapsing the lower back: Engage the core to support your spine.
Regularly practicing Warrior can build a strong foundation for more advanced yoga poses and improve overall alignment and strength.
5. Warrior II (Virabhadrasana II)
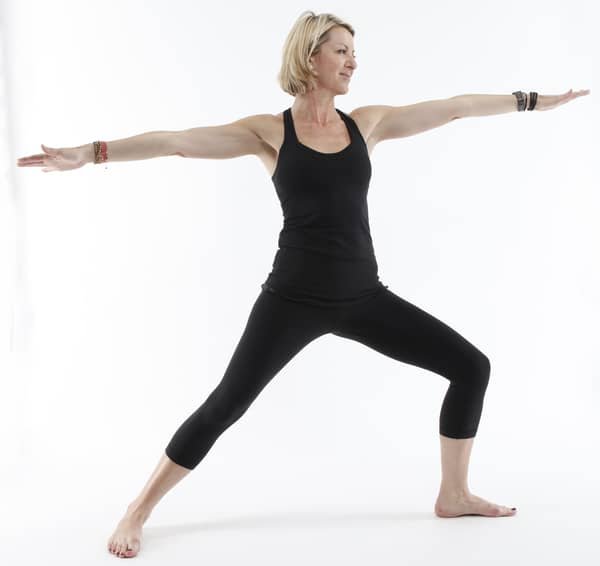
Warrior II, or Virabhadrasana II, is a powerful standing yoga pose that enhances strength, stability, and concentration. Named after a mythical warrior, it’s a standard inclusion in yoga sequences for building endurance and balance.
How to Perform Warrior II:
- Starting Position:
- Begin at the top of your mat in Mountain Pose.
- Step your left foot back about 4-5 feet, turning it slightly inward at a 45-degree angle.
- Position your right heel in line with the middle of your left foot.
- Form the Pose:
- Bend your right knee to a 90-degree angle, ensuring it’s directly above your ankle. Your right shin should form a 90-degree angle with the floor.
- Keep your left leg straight and firm, pressing the outer edge of your left foot into the mat.
- Upper Body Alignment:
- Extend your arms to the sides, parallel to the floor, with palms facing down.
- Ease your shoulders and lower your shoulder blades down your back.
- Reach through your fingertips to create a sense of energy in your arms.
- Gaze and Breath:
- Turn your head to look over your right hand, keeping your gaze soft and steady.
- Hold the Pose for several breaths, maintaining balance and focus.
- Transition Out of the Pose:
- Straighten your right leg, lower your arms, and step your left foot forward to return to the starting position.
- Repeat on the opposite side, reversing your feet and your gaze’s direction.
Benefits of Warrior II:
- Strengthens: This Pose builds muscles in your legs, core, back, and shoulders.
- Increases Stamina: Holding Warrior II boosts stamina and endurance, which benefits overall fitness.
- Enhances Balance and Stability: The stable stance improves balance and proprioception.
- Opens the Hips: The wide stance and bent knee help stretch and open the hip joints.
- Focus and Concentration: Maintaining the Pose and a steady gaze builds mental focus and concentration.
Common Mistakes to Avoid:
- Knee Alignment: Ensure your front knee is directly above your ankle to protect the knee joint.
- Torso Position: Keep your torso upright and avoid leaning forward by engaging your core.
- Foot Placement: Press evenly through both feet to distribute weight and avoid excessive pressure on one leg.
standard
6. Tree Pose (Vrksasana)
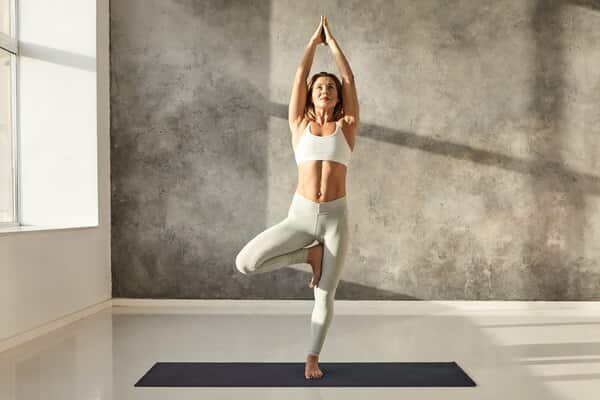
Tree Pose, or Vrksasana in Sanskrit, is a fundamental balance pose in yoga that enhances concentration, stability, and physical balance. This Pose draws inspiration from the calm and grounded nature of a tree.
How to Do Tree Pose (Vrksasana):
- Start Standing: Begin in Mountain Pose (Tadasana) with your feet together and arms by your sides.
- Shift Weight: Slowly transfer your weight onto your left foot, grounding it firmly.
- Lift the Right Foot: Bend your right knee and place the sole of your foot either:
- Against the inner left thigh (avoid the knee).
- Against the inner left calf (more accessible version).
- With toes on the ground and heel against the ankle (for beginners).
- Find Balance: Once balanced, bring your hands together in a prayer position at your chest. Focus on a fixed point to help maintain balance.
- Raise Your Arms: If stable, raise your arms above your head, shoulder-width apart or palms together. Keep shoulders relaxed.
- Hold and Breathe: Stay in the Pose for several breaths, focusing on your breath. Feel the stretch in your standing leg and the opening in your hips.
- Release: Lower your arms and return your right foot to the ground. Go back to Mountain Pose and perform the sequence on the opposite side.
Benefits of Tree Pose (Vrksasana):
- Improves Balance: Enhances coordination and balance.
- Strengthens Legs: Builds strength in ankles, calves, thighs, and spine.
- Enhances Focus: Promotes mental clarity.
- Opens Hips: Stretches and opens the hips.
- Promotes Calmness: Encourages grounding and calmness.
Tips for Practicing Tree Pose:
- Use a Wall: Practice near a wall for support if you’re new.
- Foot Placement: To prevent injury, avoid placing your foot on your knee.
- Focus Point: Fix your gaze to help maintain balance.
- Consistency: Regular practice improves balance and stability.
Tree Pose (Vrksasana) combines strength, balance, and mindfulness, making it a vital part of any yoga routine.
7. Cat-Cow Pose (Marjaryasana-Bitilasana)
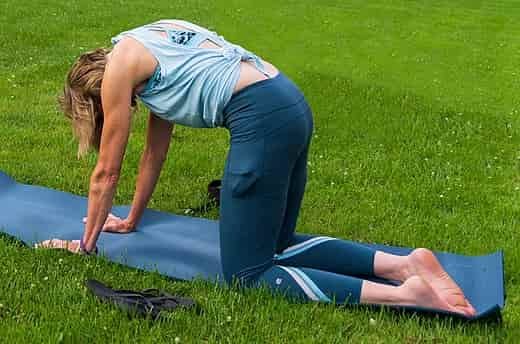
The Cat-Cow Pose is a gentle, flowing sequence of two yoga poses that stretch and warm up the spine. It’s often used as a warm-up for a yoga practice or to relieve stress and improve spinal flexibility.
Step-by-Step Instructions:
- Start in Tabletop Position: Begin by getting on your hands and knees. Place your wrists directly beneath your shoulders and your knees beneath your hips. Keep your spine neutral and your head in line with your spine.
- Cat Pose (Marjaryasana):
- Exhale and curve your spine upwards.
- Tuck your tailbone and lower your chin to your chest.
- Engage your core by pulling your belly button towards your spine.
- Visualize a cat arching its back.
- Cow Pose (Bitilasana):
- As you inhale, arch your back and let your belly drop towards the mat.
- Lift your tailbone and gaze up, opening your chest.
- Draw your shoulder blades down and together.
- Imagine you’re a cow dipping its belly.
- Flow Between the Two Poses:
- Continue to move between Cat and Cow poses, inhaling to come into Cow Pose and exhaling to move into Cat Pose.
- Synchronize your breath with your movements, making the transition smooth and fluid.
- Repeat for several breaths, allowing your spine to warm up and release tension.
Benefits:
- Spinal Flexibility: Improves flexibility and mobility of the spine.
- Core Strength: Engages and strengthens the core muscles.
- Stress Relief: Helps to relieve stress and tension from the back and neck.
- Improved Posture: Encourages proper posture and alignment.
Tips:
- Move slowly and mindfully, focusing on the sensation in your spine.
- If you have neck issues, keep your head more neutral rather than looking up in Cow Pose.
- Use a blanket under your knees if you need extra cushioning for comfort.
Regular practice of Cat-Cow Pose can help maintain a healthy and flexible spine, making it a valuable addition to any yoga routine.
8. Bridge Pose (Setu Bandhasana)
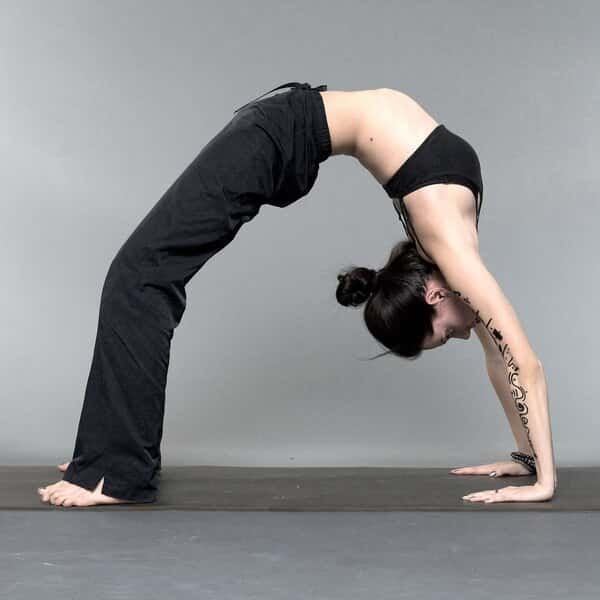
The Bridge Pose, or Setu Bandhasana in Sanskrit, is a foundational yoga posture that offers numerous benefits for the body and mind. Here’s an easy-to-follow guide on how to perform this Pose and its advantages:
Steps to Perform Bridge Pose:
- Starting Position:
- Lie on your back with your knees bent and feet flat on the floor, hip-width apart. Rest your arms along your sides with palms facing down.
- Foot and Leg Placement:
- Make sure your feet are parallel and not turned out. Draw your heels close to your buttocks, ensuring they are underneath your knees.
- Lifting the Hips:
- As you inhale, press firmly into your feet and lift your hips towards the ceiling. Engage your glutes and thighs to support the lift, keeping your knees directly over your heels.
- Positioning the Upper Body:
- Roll your shoulders underneath you, gently squeezing your shoulder blades together. This action opens the chest and supports the upper back.
- Hand Placement:
- You have two options: keep your arms extended on the mat with palms facing down or interlace your fingers underneath your back, stretching your arms towards your feet.
- Maintaining the Pose:
- Hold the Pose for several breaths, keeping your neck relaxed and your gaze directed at the ceiling. Engage your core to maintain stability and avoid lower back strain.
- Releasing the Pose:
- To release, exhale and slowly lower your hips to the floor, allowing your spine to return to the mat vertebra by vertebra.
Benefits of Bridge Pose:
- Strengthens Muscles: Engages and strengthens the glutes, hamstrings, and lower back muscles.
- Stretches the Chest and Spine: Opens up the chest and stretches the spine, counteracting the effects of prolonged sitting.
- Improves Posture: Encourages better posture by strengthening the muscles that support the spine.
- Reduces Stress: Acts as a mild inversion, calming the mind and reducing stress.
- Stimulates Organs: Massages the abdominal organs, improving digestion, and stimulates the thyroid gland due to the slight neck extension.
- Enhances Circulation: Promotes better blood flow throughout the body, revitalizing energy levels.
Incorporating Bridge Pose into your regular yoga practice can help enhance your physical strength, flexibility, and mental clarity. Whether you’re a beginner or an advanced practitioner, this Pose offers a variety of benefits that contribute to holistic health.
9. Seated Forward Bend (Paschimottanasana)
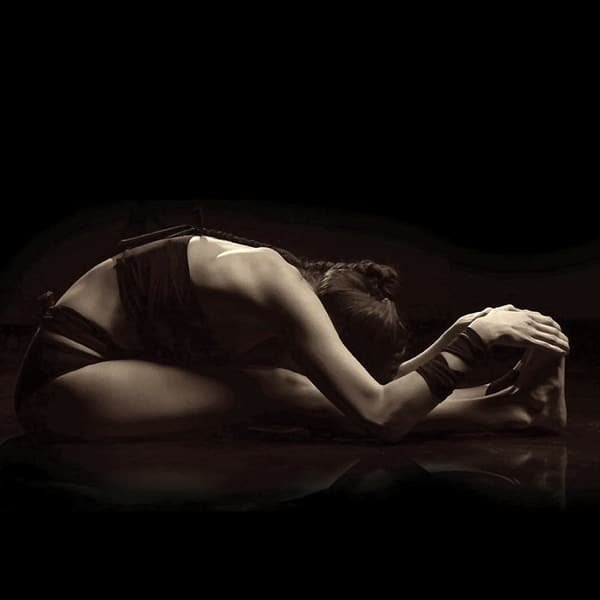
Paschimottanasana, or Seated Forward Bend, is an essential yoga pose that stretches your entire back body from head to heels. It mainly targets your hamstrings, spine, and lower back while helping you relax and become more flexible.
Steps to Perform Seated Forward Bend:
- Start Sitting:
Sit on the floor with your legs extended forward. Maintain a straight back and relaxed shoulders.
- Engage Your Core:
Pull your belly button in towards your spine to engage your core muscles. This provides stability and support for your lower back.
- Inhale and Lengthen:
As you inhale, raise your arms overhead and stretch your spine upwards, creating space between each vertebra.
- Exhale and Bend Forward:
On the exhale, bend your hips and start reaching toward your toes, keeping your spine long and avoiding rounding your back.
- Reach for Your Feet:
If you can, grab your feet, ankles, or shins. If not, place your hands on your legs or the floor beside you.
- Relax and Breathe:
Allow your head and neck to relax and breathe deeply. See if you can fold a bit deeper with each exhale without straining.
- Hold the Pose:
Stay in the Pose for 30 seconds to 1 minute, or longer if it feels comfortable. Focus on your breath and the stretch in your hamstrings and back.
- Release the Pose:
To come out, slowly lift your torso back up on an inhale, keeping your spine straight.
Benefits of Seated Forward Bend:
- Stretches the Spine and Hamstrings: Provides a deep stretch to your back body, promoting flexibility.
- Calms the Mind: Helps reduce stress and anxiety, fostering a sense of calm.
- Improves Digestion: The forward fold can stimulate digestive organs, aiding digestion.
- Relieves Tension: Eases lower back, shoulders, and neck tension.
Modifications and Props:
- Use a Strap: If you have tight hamstrings, use a yoga strap around your feet and hold the ends.
- Bend Your Knees: Beginners or those with tight hamstrings can bend their knees slightly to make the Pose more accessible.
- Sit on a Blanket: Sitting on a folded blanket can elevate your hips and make it easier to fold forward.
Paschimottanasana is excellent for beginners and advanced practitioners, offering physical and mental benefits when practiced regularly.
Continue to move between Cat and Cow poses, inhaling to come into the Cow Pose and exhaling to move into the Cat Pose.
10. Corpse Pose (Savasana)
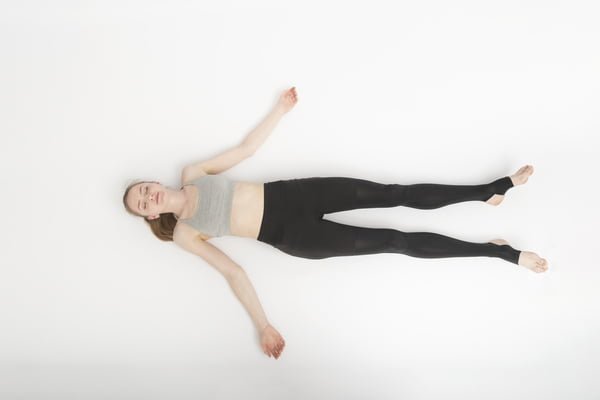
Corpse Pose, or Savasana is a basic relaxation pose usually done at the end of a yoga session. Although it seems simple, doing it right requires attention to get the full benefits. Here’s how to do it:
- Preparation:
- Lay down on your back on a yoga mat. Make sure the surface is comfortable but firm enough to support your spine.
- Spread your legs apart comfortably, letting your feet fall naturally to the sides.
- Place your arms alongside your body but slightly away from it, with your palms facing up. This helps release tension in your shoulders and chest.
- Alignment:
- Ensure your head is in line with your spine. Avoid tilting it to one side.
- Close your eyes gently to focus inward and relax.
- Take a few deep breaths to settle into the Pose, inhaling through your nose and exhaling through your mouth.
- Relaxation:
- Start relaxing each body part from your toes and moving up to your head. Mentally scan your body and release any tension you find.
- Let your breath return to its natural rhythm. Just observe it without trying to control it.
- Mental Focus:
- As you lie still, focus on your breath or any specific point, like the rise and fall of your abdomen.
- If your mind starts to wander, gently bring it back to your breath or chosen point of focus. This helps cultivate mindfulness and reduce stress.
- Duration:
- Remain in Savasana for a minimum of 5 to 10 minutes. Advanced practitioners may stay longer, depending on their practice and comfort level.
- Conclusion:
- To exit the Pose, begin by taking deeper breaths. Begin to wiggle your fingers and toes to awaken your body gently.
- Roll over to one side into a fetal position and rest there for a moment, using your arm as a pillow.
- Slowly push yourself into a seated position using your hands, keeping your eyes closed as you gradually return to an alert state.
Benefits:
- Physical Relaxation: Reduces muscle tension and improves circulation.
- Mental Clarity: Promotes a calm mind, helping reduce stress.
- Emotional Balance: Encourages inner peace and emotional stability.
By adding Corpse Pose to your routine, you can end your yoga session calmly, allowing the benefits to integrate deeply into your body and mind.
Conclusion
Adding these yoga poses to your routine can boost your overall well-being. They help stretch and strengthen muscles, clear your mind, and promote relaxation. Whether you’re a beginner or more advanced, you can adjust these poses to fit your needs, ensuring your practice is safe and effective. Approach each Pose with mindfulness and patience, listen to your body and respect its limits. This way, you’ll build a sustainable and rewarding yoga practice that nurtures your body, mind, and spirit.

Ruby
Ruby is a certified fitness coach and trainer dedicated to helping individuals achieve their health and fitness goals. Specializing in personalized workout plans, Ruby provides expert guidance and motivation to clients of all fitness levels. Her energetic and supportive approach ensures effective, safe, and enjoyable training experiences.